Thank you for using Wallem Port DA Platform.
If you have any concern or you need a copy of this guideline, kindly click the button below.
Contact Us Download Port DA User Guide for Agent
Thank you for using Wallem Port DA Platform.
You should have received an ‘Agent Code’ from Wallem Group at port call nomination. If not, please enquire your Wallem Group contact person or the Wallem Finance Team for such before proceeding with the following.
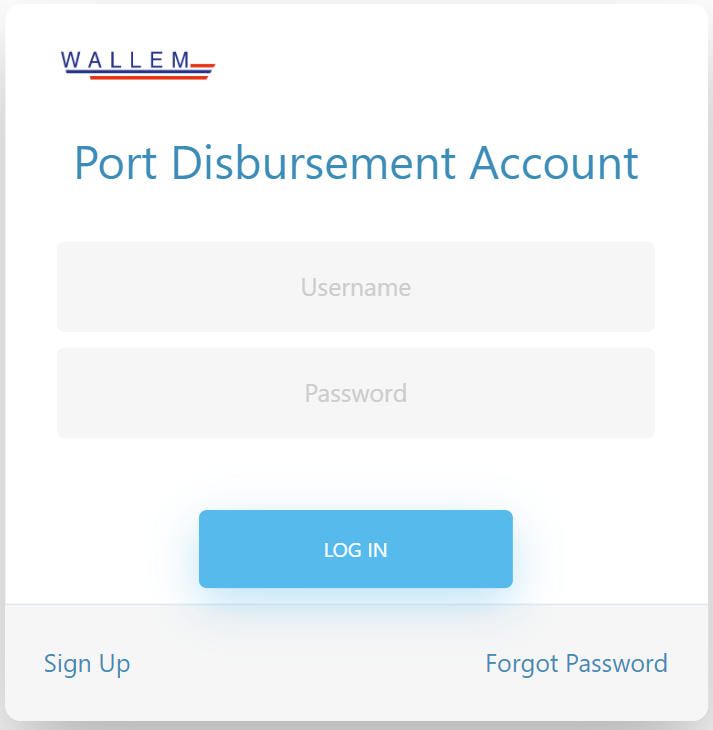
Start Chrome browser and access https://portda.wallem.com/
Fill in Username and Password and click .
-
If you do not have a user account in this platform, please register; steps are in next section.
- Here are the email addresses you can contact for the Finance team regarding agent code: rosc@wallem.com and ermm@wallem.com
- For other concerns, you can click on the “Contact us” page on the Port DA Platform.
3.1 TO REGISTER TO AN AGENT ACCOUNT
User Account Registration is required once only. You will use the same user account for port DA submissions for all port calls that nominated by Wallem Group in the future.
NOTE: You need below information to proceed with account registration.
Email Address
Agent Code (you should have received ‘Agent Code’ from Wallem Group)
Bank Account No. (your bank account number that already provided to Wallem Group)
Contact Name
In login screen, click Sign Up.
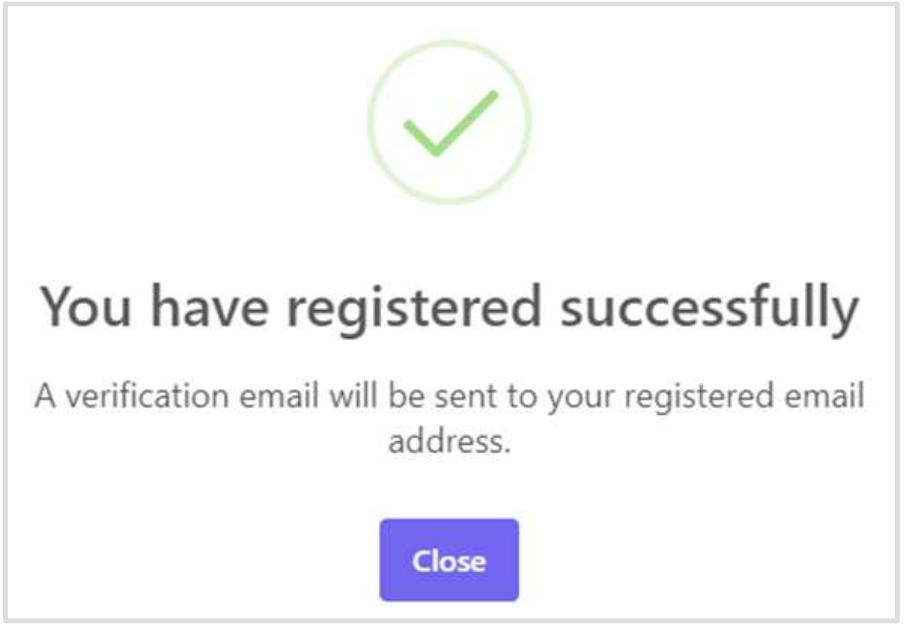
Fill in all info and click , below message is displayed
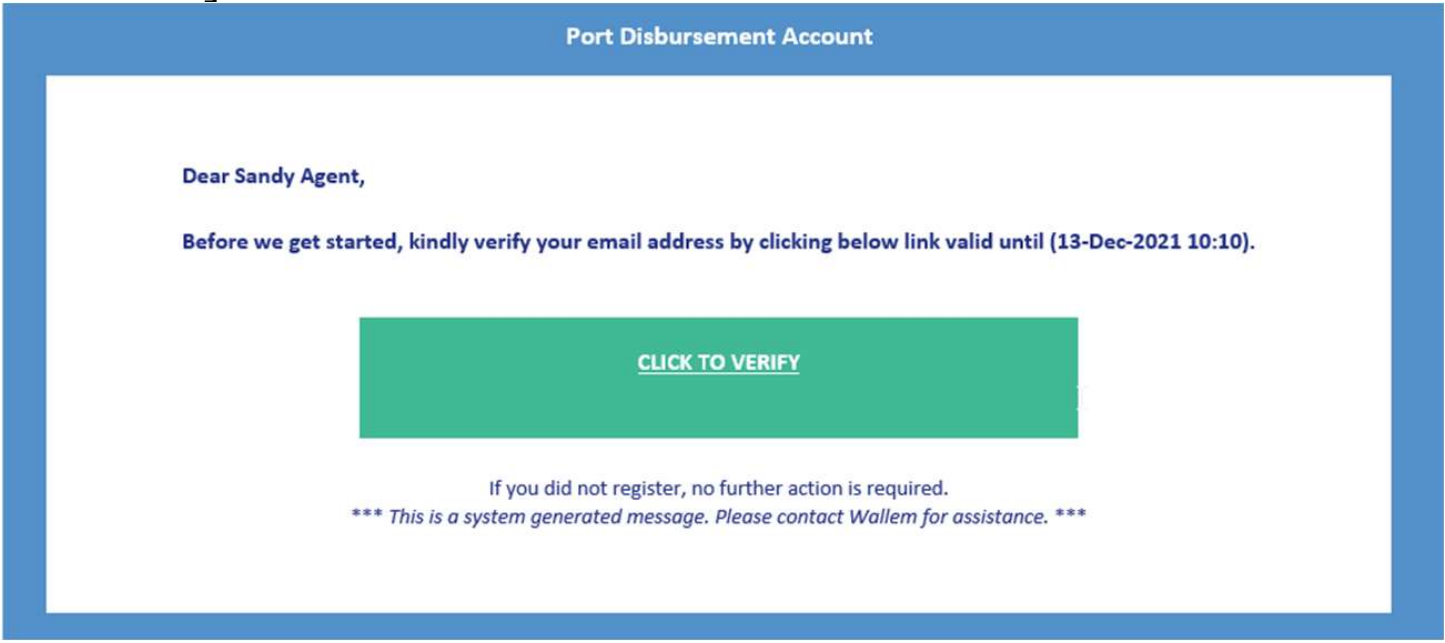
An email is sent to your registered email address. Sample as below. Click .
Verification message is displayed in your browser. Account registration is completed. Click to go to Port DA login screen.
IMPORTANT: please keep your user account information safe.
4.1 TO SUBMIT FDA
After logged in, click at menu bar.
Fill in FDA basic information:
Vessel Name
FDA Ref No.
Country of Call
Port of Call
Currency
Port Call Start Date
Port Call End Date
NOTE: FDA date will be automatic filled by submission date. For example, if you saved the Draft FDA on 29-Sep-2022, the initial FDA date is also 29-Sep-2022. Afterwards, when you submit the FDA on 30-Sep-2022, the FDA date will be changed to 30-Sep-2022.
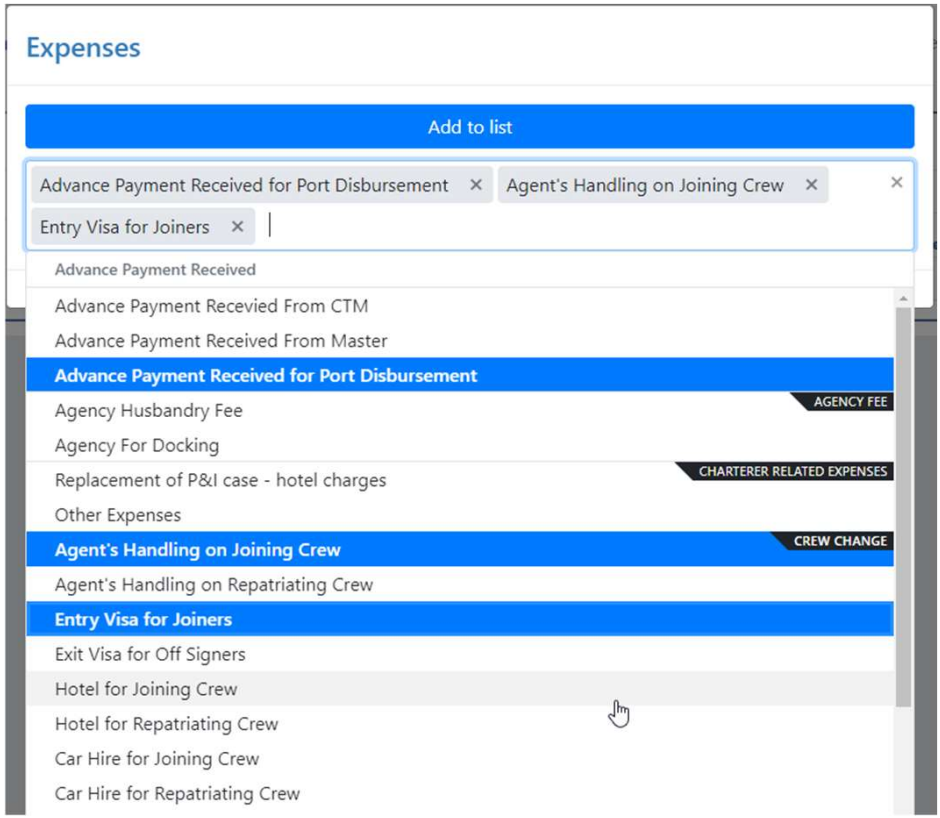
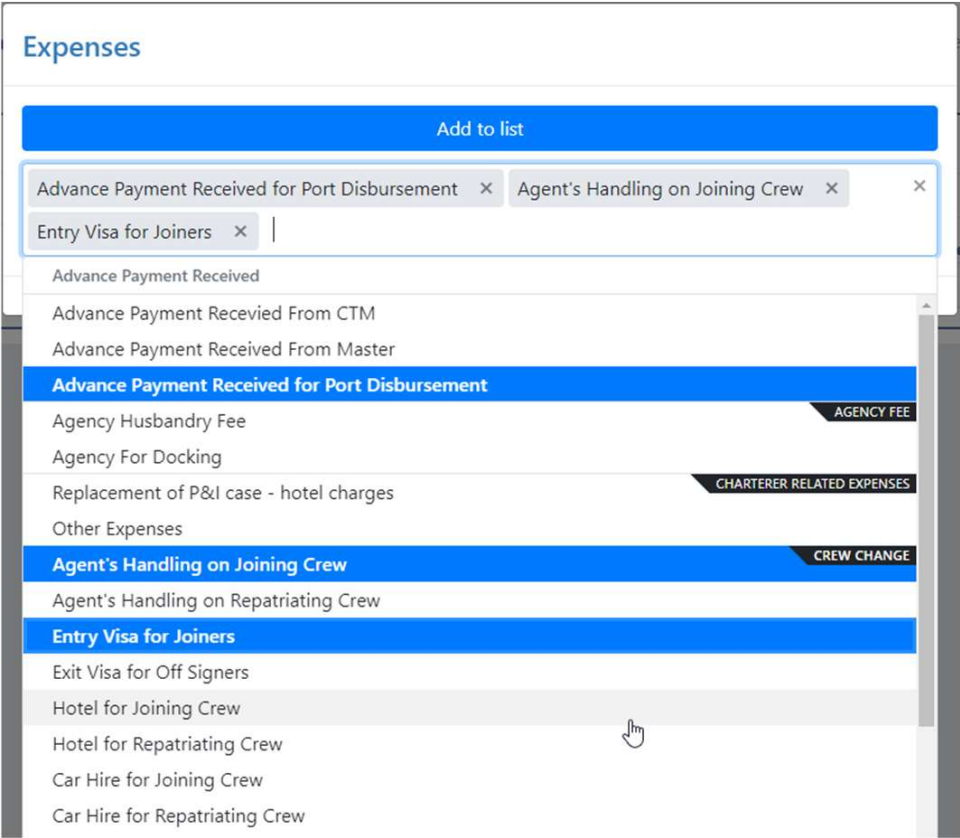
Click the area after FDA basic information to add expense items.
“Expenses” selection list is pop up.
Select one or more items and click to add expenses into your FDA.
CTRL+A to Select A


Agency fee has 2 types, regular agency fee or agency fee for docking.
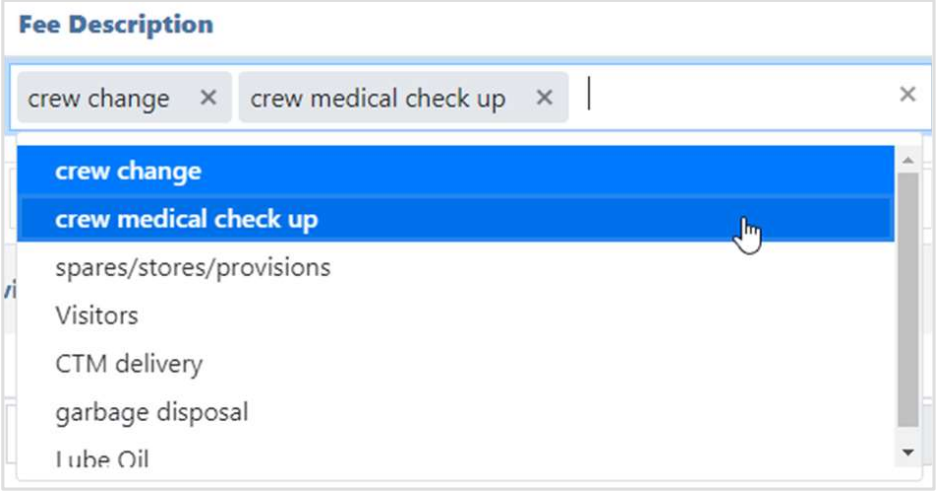
Select Fee Description, fill in Quantity, Rate and/or Amount wherever appropriate.

Input Currency, which is dropdown list, then input original amount, rate of exchange and delivery date to Ship.
For the other expensed related to CTM such as agent’s handling fee, security guard fees, bank charge, transportation, and insurance, select the fee description, fill in percentage and/or amount whenever appropriate.


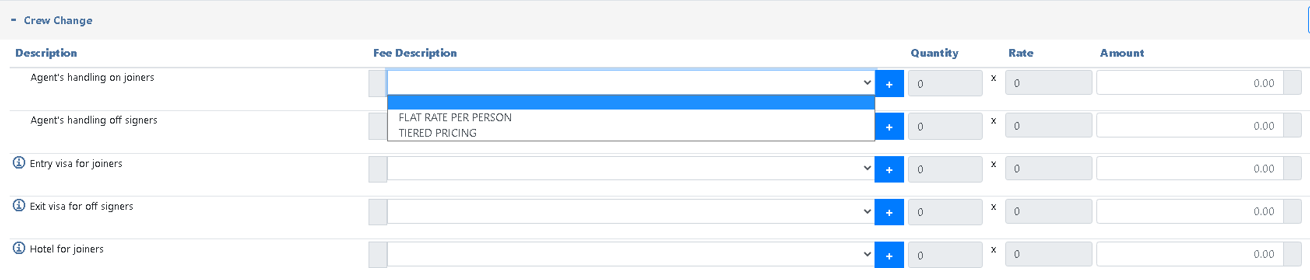
There is standard list of crew change expenses that can be selected both for joiners and off signers in the platform.
Choose the appropriate expense, then select Fee description, fill in Quantity, Rate and/or amount wherever applicable.
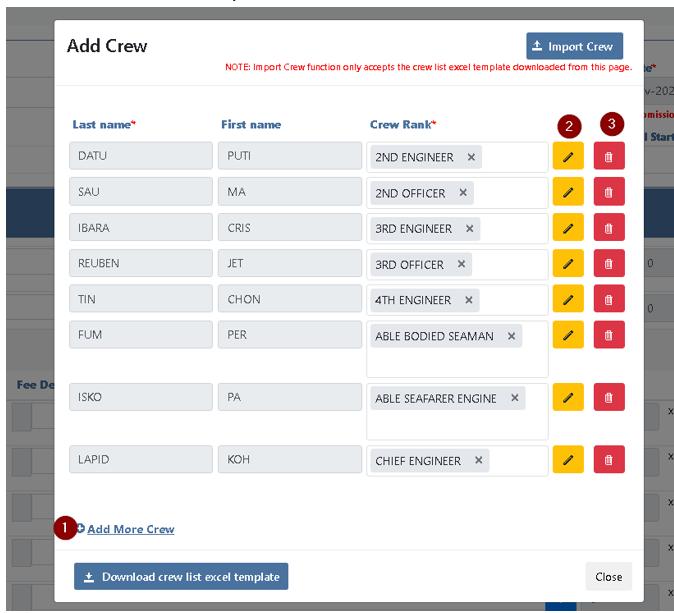
Click [+] to add crew information
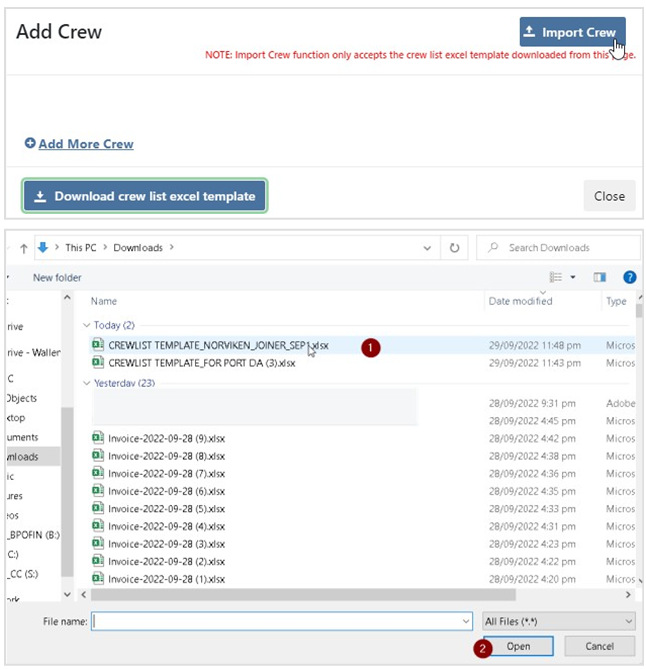
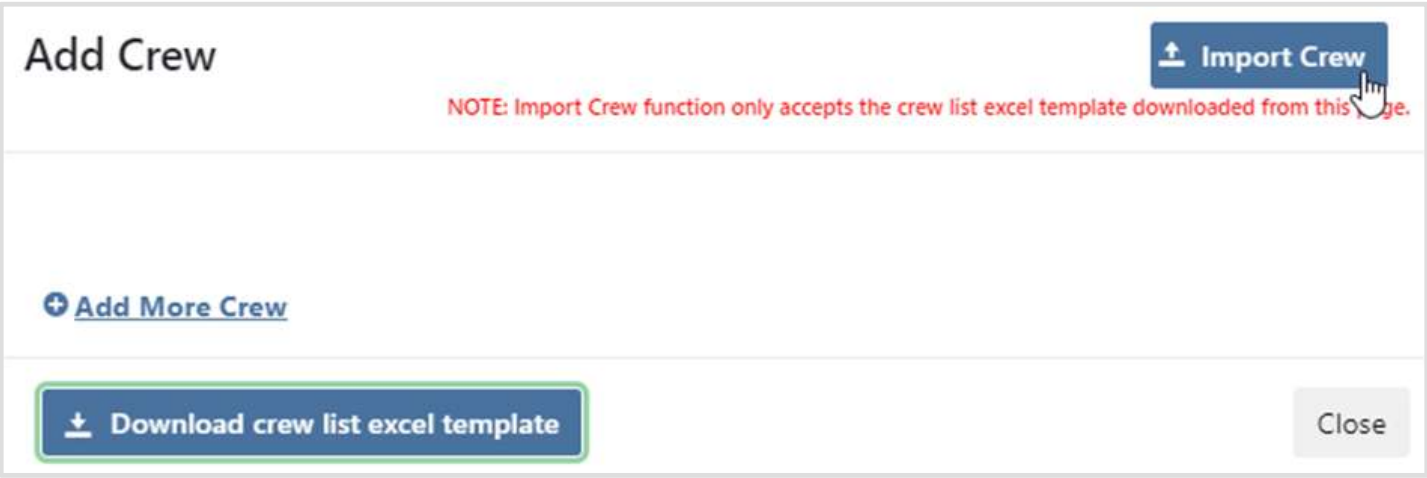
Click “Add Crew” and a pop up will be displayed.
Fill in the required crew information such as Last Name, First Name and Rank
Click “Add More Crew”, to add more crew names
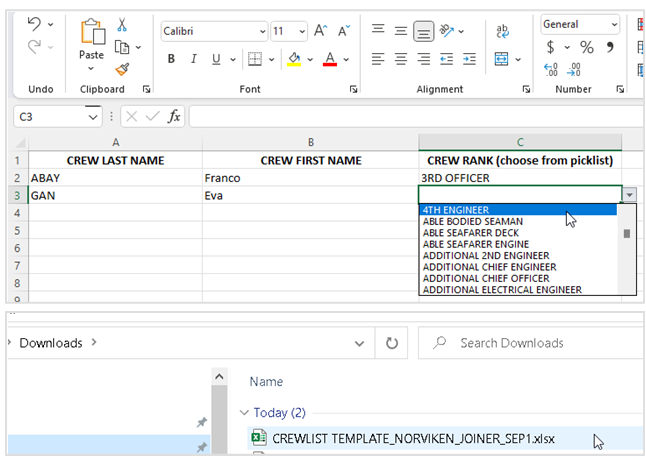
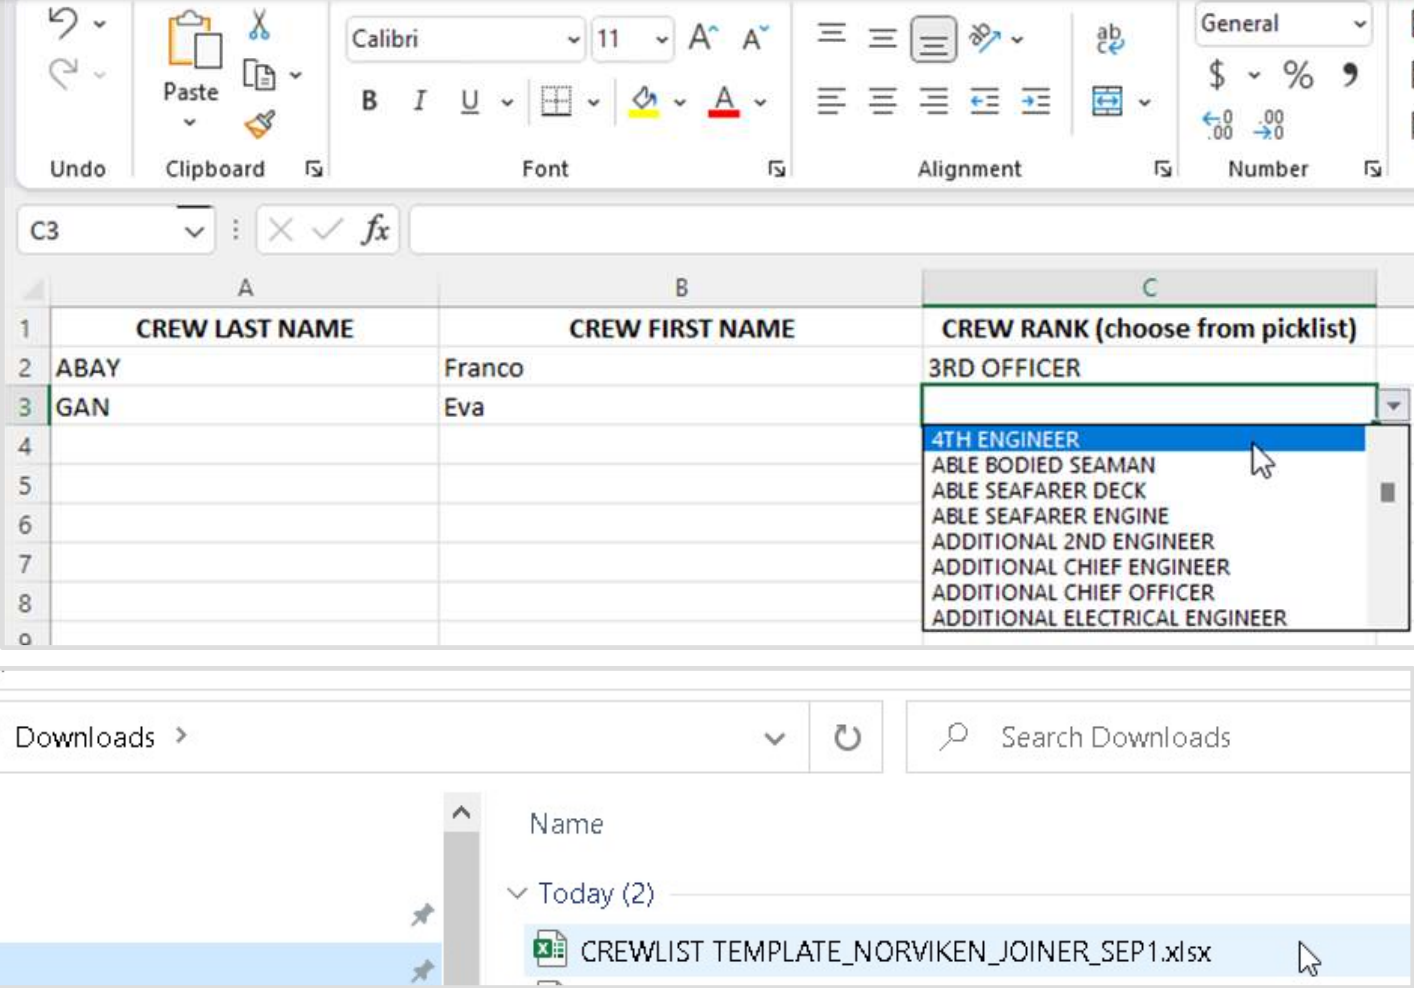
Optionally, if you have more than 2 crew, you can upload a crew list (name and ranks), by clicking “Download crew list excel template”
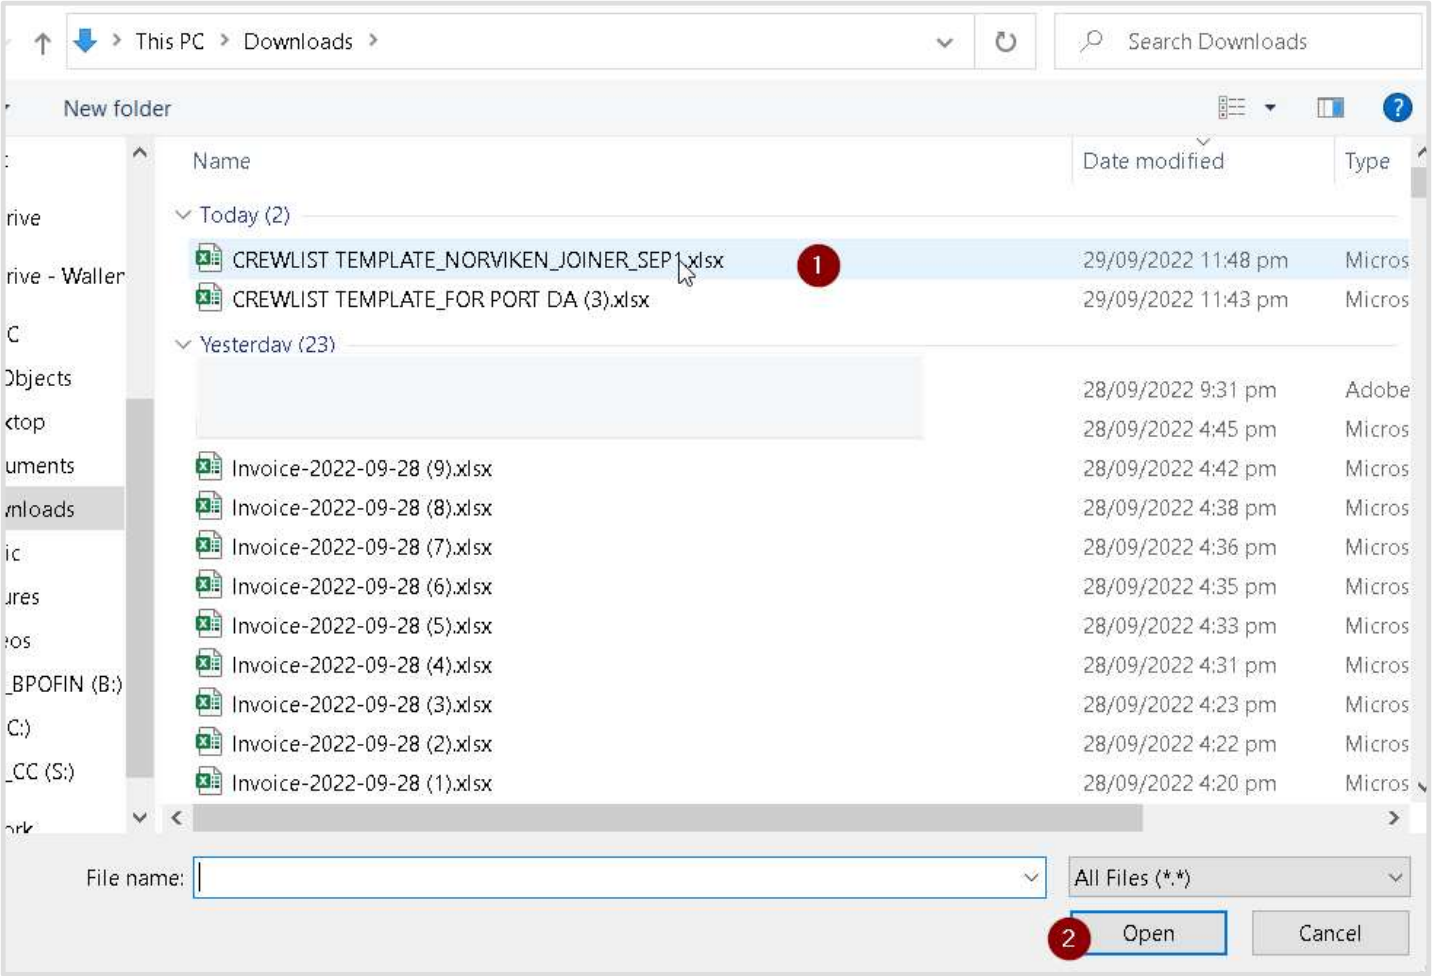
Open the downloaded template (usually in your folder “Downloads”). Input the crew Last Name, First Name and ranks (dropdown list) then save the file.
Click “Import Crew” on the Add Crew screen, select the saved crew list file and click open.
Crew names and rank will be listed based on the information on save file.
You can add more, edit or delete if needed.
Click “Close”.
To add crew change expense, click “Add Items”, then click the box and list of expenses will show for you to select.
For items where “i” is found before the expense name, this signifies that supporting receipts/vouchers need to be provided


Expenses related to crew medication will be recorded here, from agent’s assistance, actual medical charges such as medicines, hospital bills, doctor’s fee, etc. to mobilization either via car hire or form of transportation such bus/train fare, etc.
Choose the appropriate expense, then select Fee description, fill in Quantity, Rate and/or amount wherever applicable.
Add crew name, the process is the same as crew change. Please refer to instructions stated above.

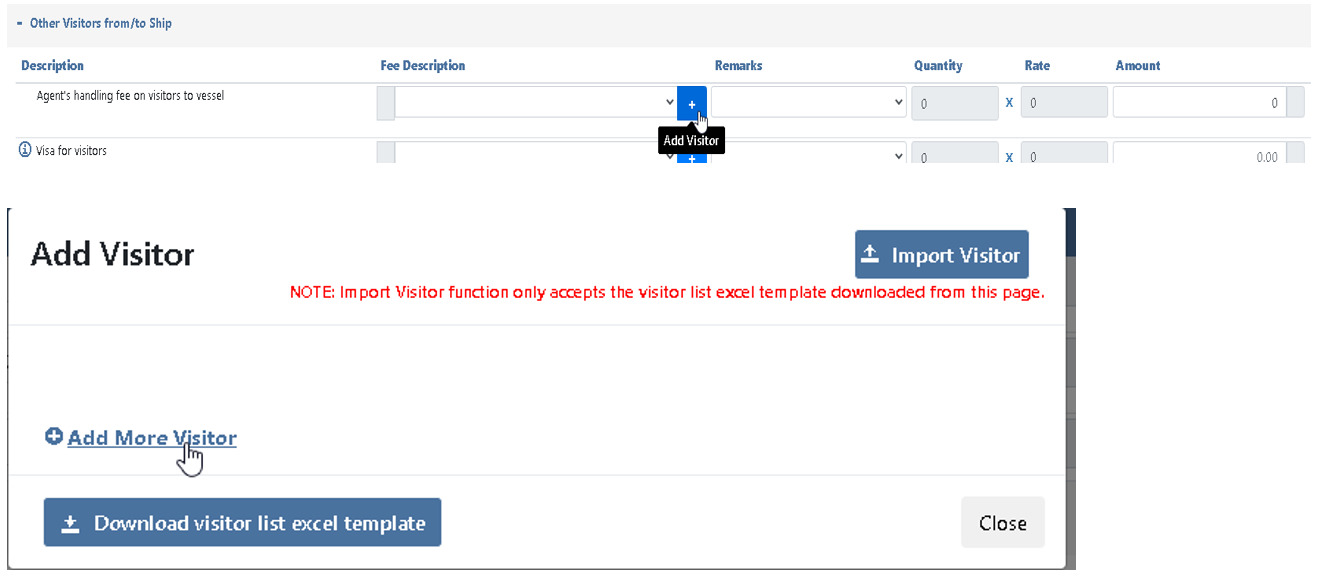
This section is for expenses incurred by ship’s visitors such as Owner’s representatives, PortSuperintendent, Surveyor/Inspector, Technicians and Wallem Superintendent.
Choose the appropriate expense, then select Fee description, fill in Quantity, Rate and/or amount wherever applicable.
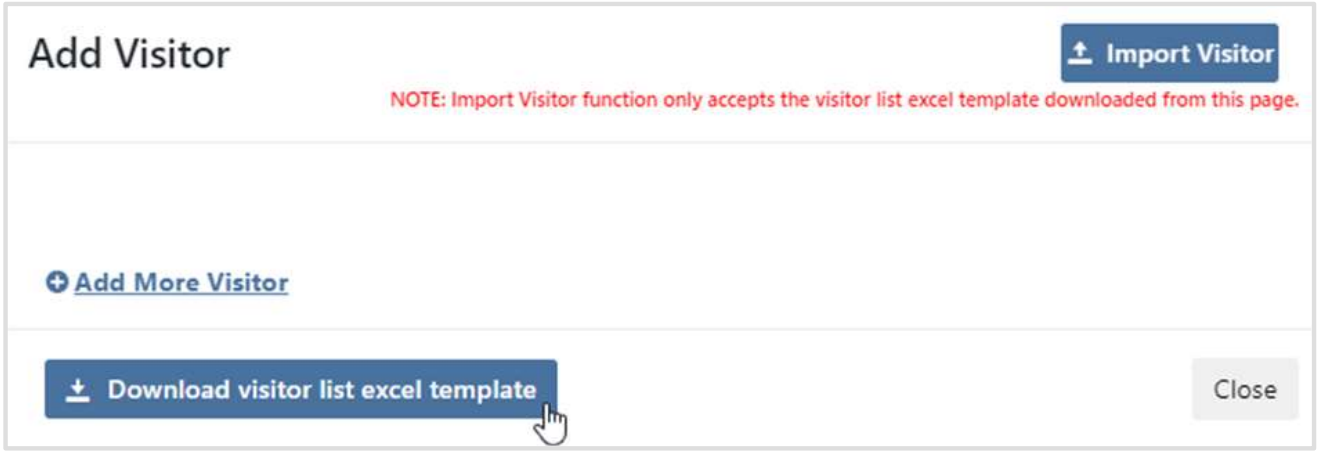
Click [+] to input visitor information.
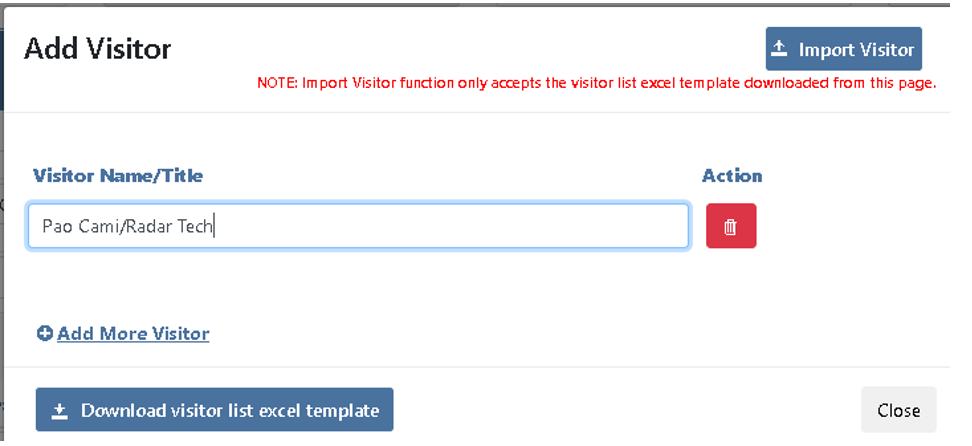
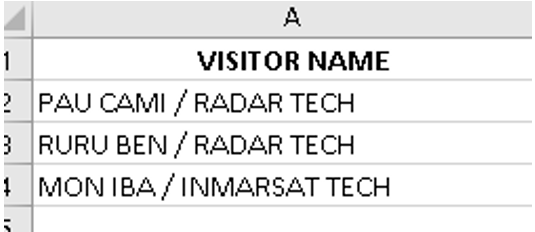
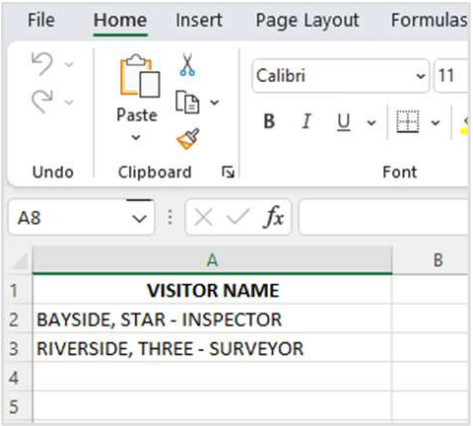
Click “Add More Visitor”, input the visitor’s name and title, e.g., Pao Cami/Radar Tech.
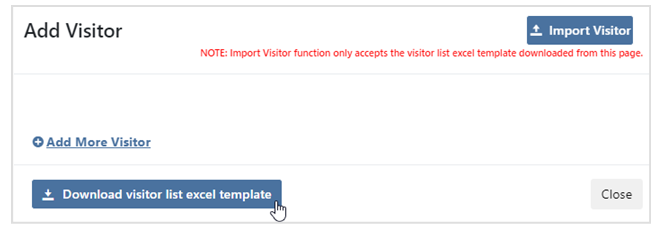
Optionally, if there are more technicians visiting the ship, you can upload visitor list. Please upload visitor list per type of visitors and DO NOT mix technicians with surveyors, etc.
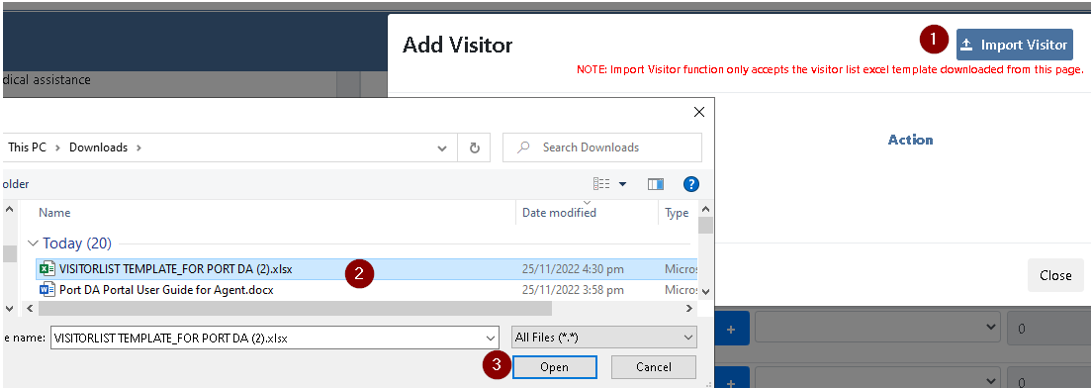
Click “Download visitor list excel template”.
Open the downloaded template (usually in your folder “Downloads”). Input visitor names/Tiles, then save the file.
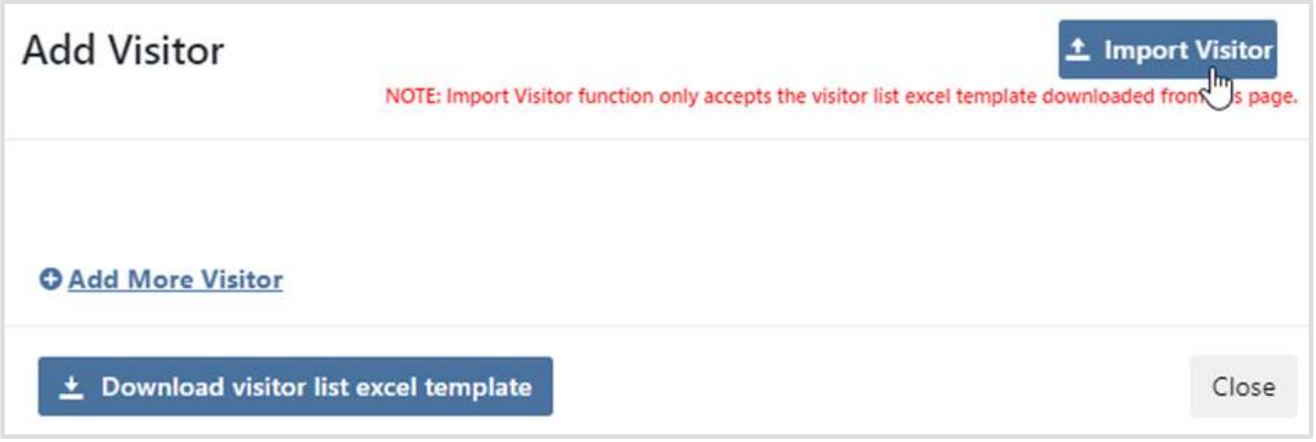
Click “Import Visitor” on the Add Visitor Screen. Select the saved visitor list file and click “open”.
Visitor name and title will be listed based on the information on save file.
You can add more visitors, edit or delete if needed.
lick “Close”.
If launch hire was used specifically for crew change only or a combination of crew change, CTM delivery, crew medical and supply of items onboard, please select “LAUNCH HIRE”
Select under Fee Description on which item/items or service/s the launch hire is related to, the put in remarks and amount.
If launch hire was used to combine delivery of items such as stores, spares, provisions, garbage disposal, lube oil supply, please select “Launch hire (spares/stores/provisions).
Select under Fee Description on which item/items the launch hire is related to, the put in remarks and amount

This section is related to customs, delivery charges, handling and equipment hire for documents, provisions, stores and spares delivery.
Choose the appropriate expense, then select Fee description, fill in Quantity, Rate and/or amount wherever applicable.

This is section covers Fresh water supply, Shore leave/shore pass, garbage disposal, courier/mail delivery cost, Agent’s overtime, delivery charge for bunker/oil sample and any handling fee charge for stated services.
Fresh Water – select the fee description and input the amount.
Shore Leave/shore passes – visitor name, input the rate.
Garbage Disposal – input the quantity and rate.
5Courier/crew mail delivery – input the quantity and rate.
Handling fee (other services provided) – input remarks, e.g., handling fee for garbage, then input the amount

For expenses which are not on the standard list like Port Dues, Tonnage dues, etc, you can use Other Expenses under Charterer Related expenses. Under Fee description, enter the Expense name and amount.

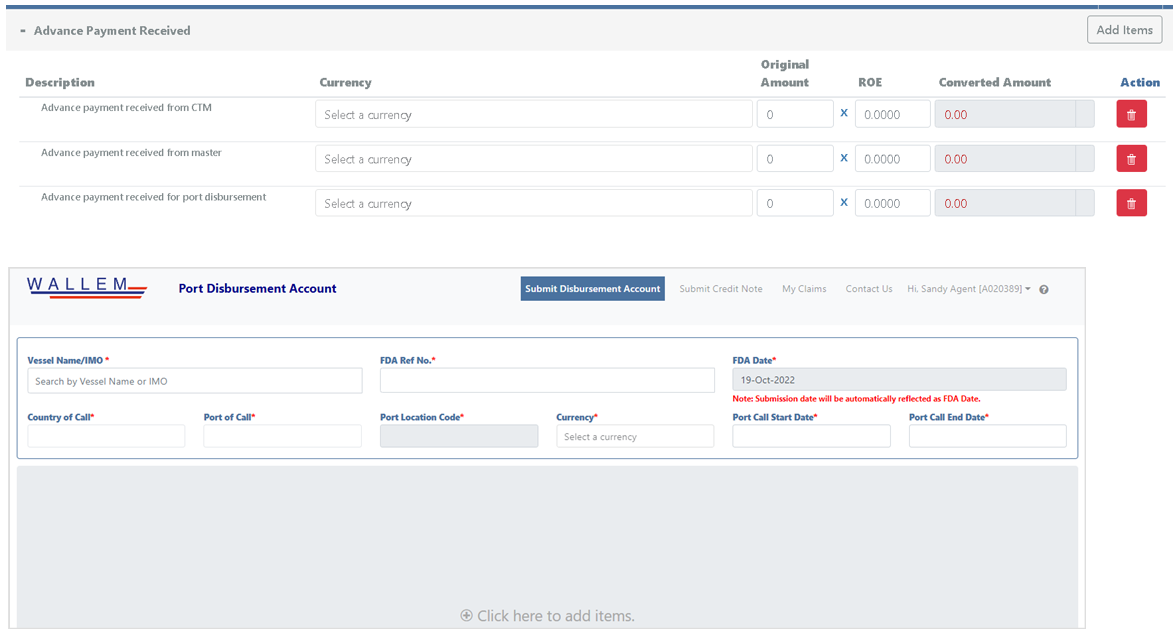
This section is related to advance payment related to CTM, payment made by Master and advance payment received for port disbursement.
Select the currency, input original amount and rate of exchange (ROE).
To edit the Claim, go to My Claims and Click Edit. There are no validations during saving, but Header details should be filled out.
NOTE: once the FDA is submitted, no changes can be made.
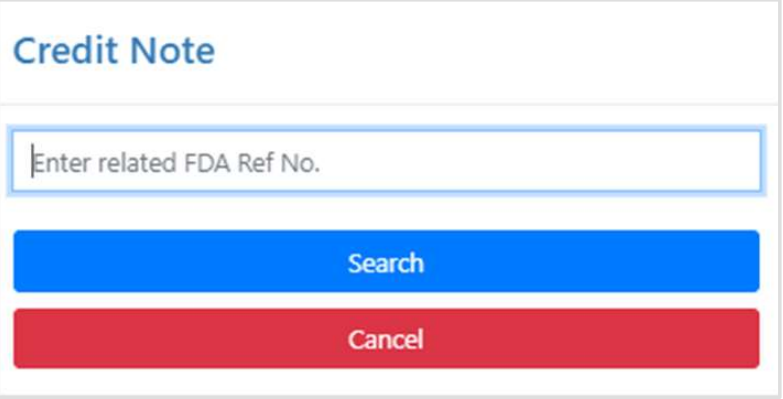
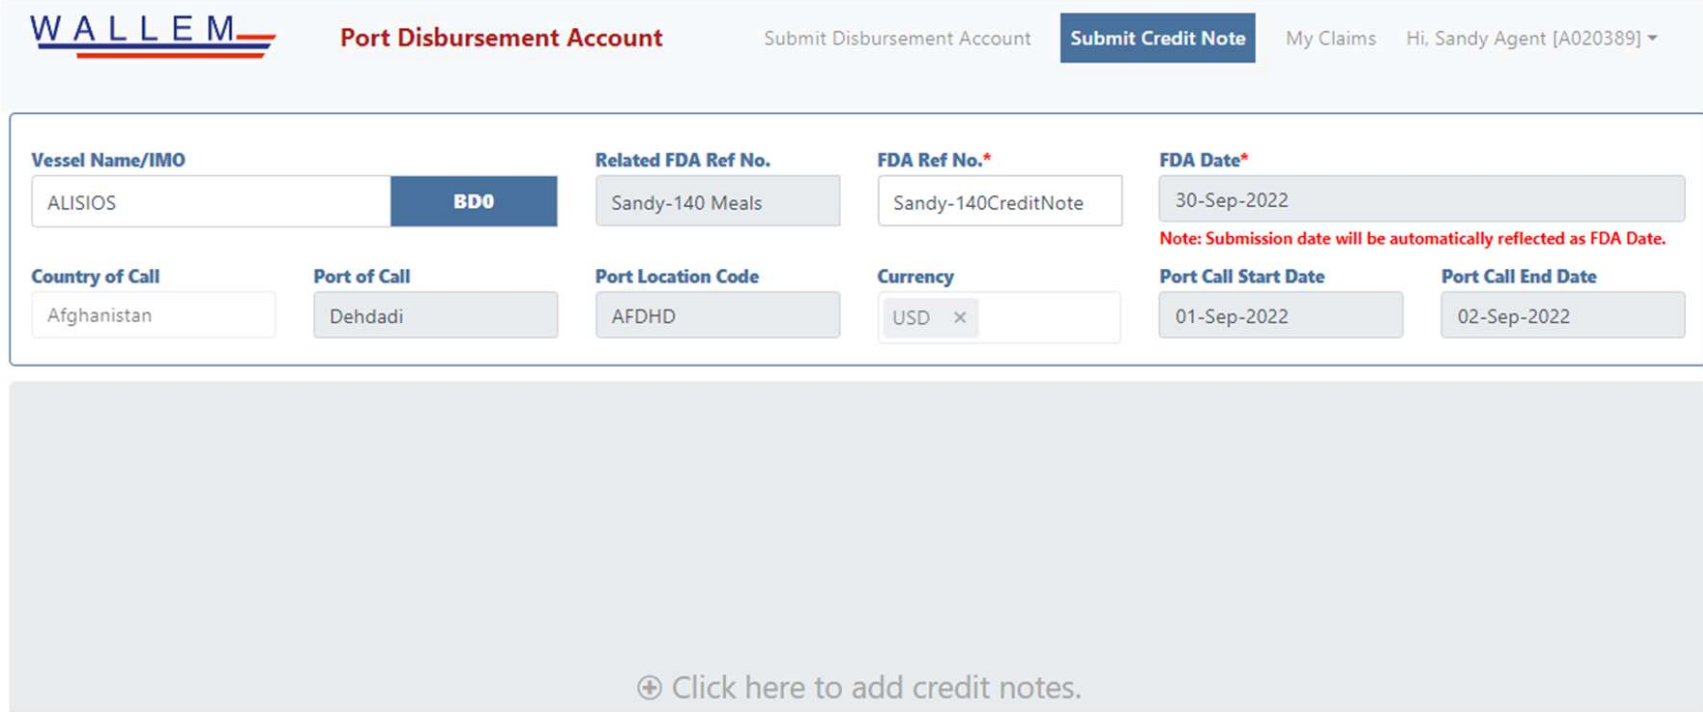
4.2 TO SUBMIT CREDIT NOTE
After logged in, click at menu bar.
“Credit Note” pop up is displayed. Fill in the related FDA Reference Number and click .
The related FDA basic information are displayed. Fill in Credit Note information such as Reference Number (Credit Note Number).
Click the area after CN basic information to add expense items.
“Expenses” selection list will pop up.
-
Select one or more items and click to add expenses into your FDA.
CTRL+A to Select ALL According to different expense items, fill in details for the amount.
Example 1, add basic item:
Select Fee Description, fill in Quantity, Rate and/or Amount wherever appropriate.
Example 2, add CTM:
Input Currency, Original Amount, ROE, Date of receipt by Master.
Example 3, add CTM related item:
Select Fee Description, fill in Percentage and/or Amount wherever appropriate.
Example 4, add crew related item:
Select Fee Description, fill in Quantity, Rate and/or Amount wherever appropriate.
Click
“Add Crew” pop up is displayed.
Click Add More Crew, fill in Crew Name and Crew Rank
Optionally, you can upload crew list (names and ranks).
Click .
-
Open the downloaded template (usually in your folder “Downloads”). Input crew names and select the rank on the picklist, then save the file.
Click on the Add Crew screen. Select the saved crew list file and click open.
-
Crew names and ranks are listed based on the information on the saved file.
Add more or delete any names if needed.
Click
Example 5, add visitor related item:
Select Fee Description, fill in Quantity, Rate and/or Amount wherever appropriate.
Click
“Add Visitor” pop up is displayed.
Click Add More Visitor, fill in Visitor Name/Title.
Optionally, you can upload visitor list.
Click .
Open the downloaded template (usually in your folder “Downloads”). Input visitor names/titles. Then, save the file.
Click on the Add Visitor screen. Select the saved visitor list file and click open.
Visitor names are listed based on the information on the saved file.
Add more or delete any names if needed.
Click
Example 6, add launch hire related item:
Select Fee Description, fill in Remarks and/or Amount wherever appropriate.
Click if you want to save the claim to be edited later, it will be marked as Draft. To edit the Claim, go to My Claims and Click Edit. There are no validations during saving but Header details should be filled out.
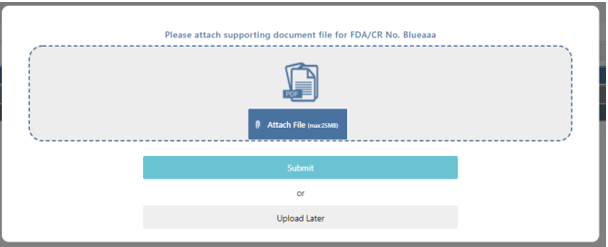
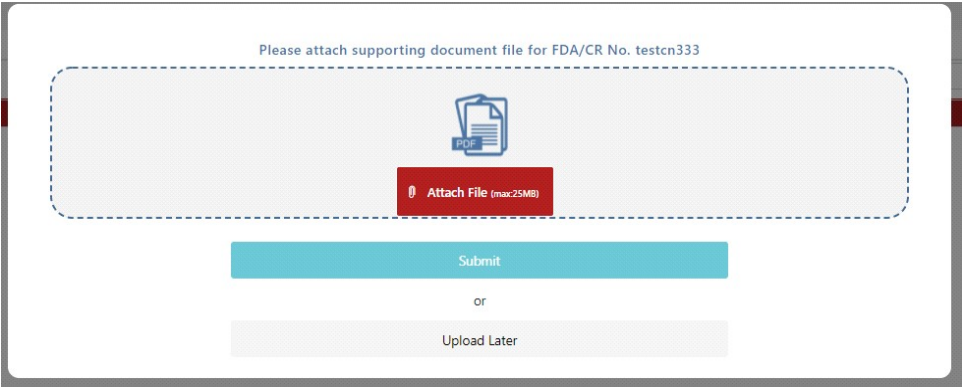
For Claim Submission, click , Click to Submit the Claim or (this will mark the Claim as No Attachment and a File needs to be uploaded under My Claims for it to be marked as Submitted.
A successful submission message is pop up if information provided are sufficient. Otherwise, various fields on screen are highlighted. Please correct all missing/invalid information and submit again.


NOTE: once the FDA is submitted, no changes can be made.
After logged in, click [My Claims] at menu bar.
All submitted FDA and CN are displayed.
To search a document, fill in keyword whatever you need to search in the [Search…] box. List is filtered accordingly.
To list all documents again, remove the keyword in the [Search…] box.
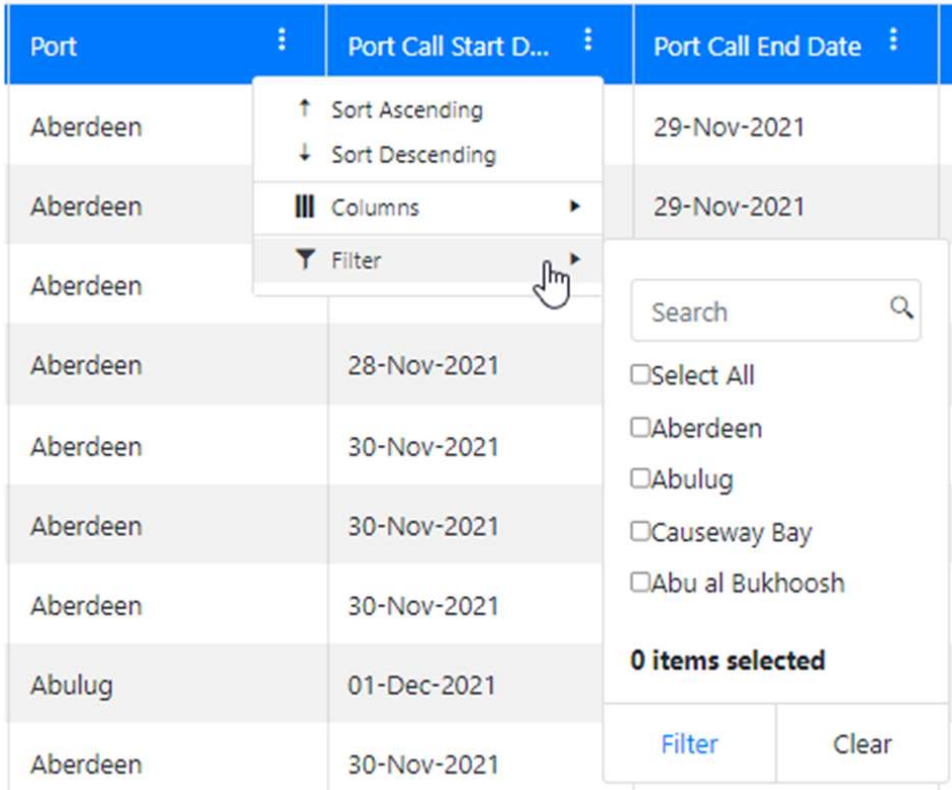
To add filter to a column, click 3 dots at column heading, select [Filter].
To sort a column, click 3 dots at column heading, select [Sort Ascending] or [Sort Descending].
To group data, click and drag a column heading into area “Drag a column header and drop it here to group by that column
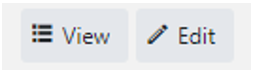
Click [View] to see details.
To view uploaded file, click [View attachment].


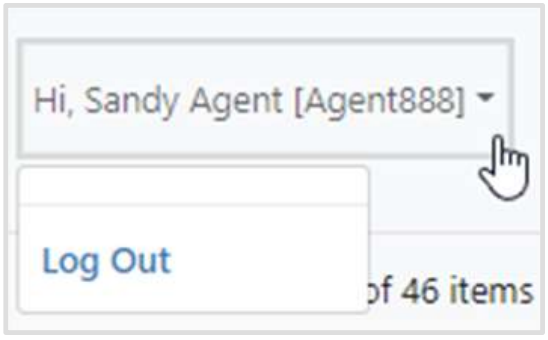
At top right corner of the screen, click your logged in name and select [Log Out].
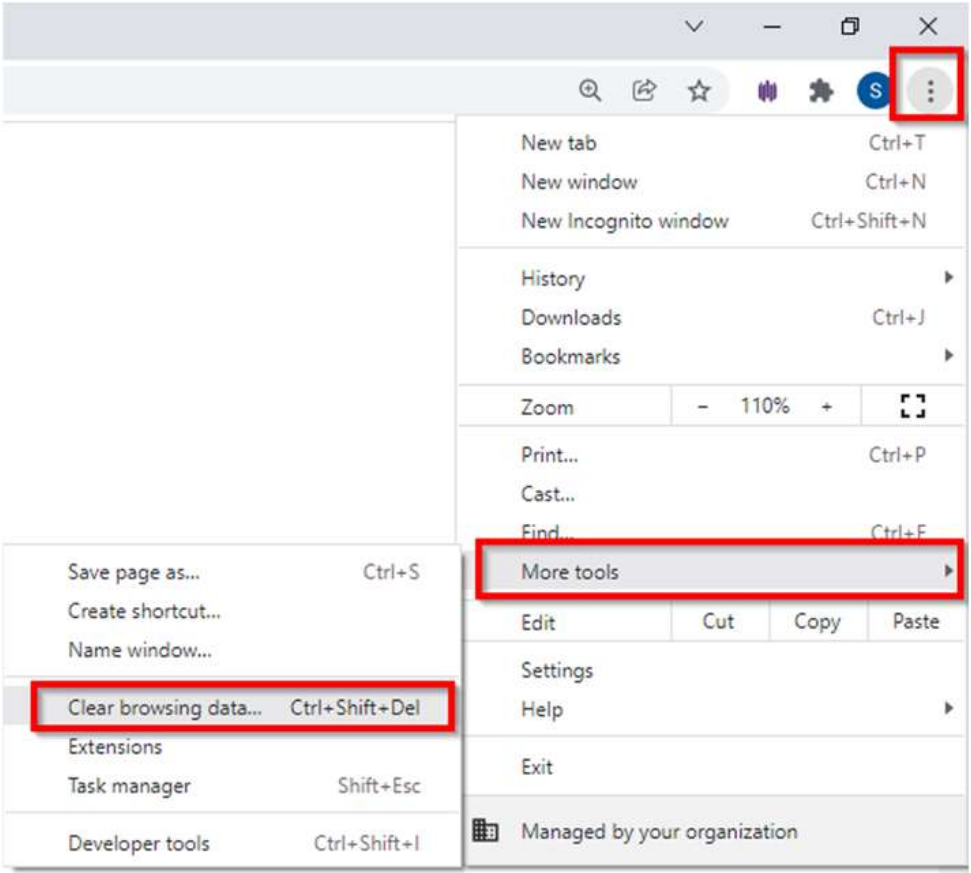
7.1 BROWSER ISSUES
Most browser issues can be resolved by deleting cookies and cache and/or using a private browser or
incognito mode.
Please follow below steps to delete cookies and cache
Start Chrome
At top right of the screen, click Chrome Control.

Click More tools and then Clear browsing data.
Select a time range. To delete everything, select All time.
Check the boxes for "Cookies and other site data" and "Cached images and files".
Click [Clear data].